Waves Audio - StudioVerse Instruments

In the fall of 2023, I worked with Waves Audio to design preset chains for the release of StudioVerse Instruments, their virtual instrument plugin chainer. I mostly focused on creating various types of sounds and presets in the chillhop music genre. I created a total of 160 preset chains for this plugin, and I also created short MP3 previews of each preset. This plugin was released in June of 2024.
(If you prefer watching a demo of my sounds to reading about them, feel free to skip to the end)
StudioVerse Instruments
Before diving into the sound design process, I’d like to briefly talk about StudioVerse Instruments. This is a tool that allows you to stack Waves instrument and effect plugins, to split instrument plugins across the MIDI keyboard, perform multiband splitting of a sound, layer multiple instrument plugins together, etc. This tool also features the use of Macro controls, which can be mapped to control one or several parameters across different plugins. If you’re familiar with the instrument Racks in Ableton Live, this is a similar idea.
With this background, let’s get into the actual sound design work I did.
Genre
For this project, Waves asked me to mainly focus on creating sounds that would sound at home in the chillhop genre. Specifically, they gave me the OlliOlli World soundtrack (listen here) as a reference. They also encouraged me to explore sounds that could work in lofi and hip-hop more generally.
With this in mind, I created the majority of my preset chains to fit the chillhop genre. I created many relatively “clean” or “pristine” synth sounds, like leads or keys, where the raw waveforms were not modified very much, but featured snappy filter envelopes, filter resonance squelching, or interesting pitch sweeping and warble.
Near the end of completing the project, Waves encouraged me to step beyond the boundaries of the chillhop genre and create presets in whatever style I chose. I took this opportunity to create some familiar gritty and grimy patches similar to those I created for audiolatry’s RetroGrit plugin (read about my work on this plugin here). But, I also took this freedom as a chance to really push the boundaries of the different instrument and effect plugins, and to find unconventional ways of exploiting their modulation capabilities, characters, sounds, and general behaviours. I explore some examples of this in the “instruments and effects” further below.
Preset Chains
I created a total of 160 preset chains for StudioVerse Instruments.
For the majority of the presets, I was given eight categories of presets to create:
pads
basses
leads
keys
“keyboard split” patches (for example, a synth bass on the left side of the keyboard and a pad on the right. Part of the idea was that these might mostly be used for live performance)
arpeggios
“All-in-one” - hold down a key, and hear a melody/song
OMAKASE (chef’s choice) - basically, whatever I wanted! I tried to explore types of sounds that wouldn’t neatly fit into the above categories like experimental ideas, textures, sound effects, etc.
Technical Requirements
Waves had me adhere to a few important technical requirements. For each preset, a minimum of four Macros needed to be created (and functional), though we were encouraged to reach or get as close to the maximum of eight as possible. The ModWheel also needed to be mapped to perform some sort of function (vibrato, tremolo, engaging some other effect, etc.) in each preset as well. We also needed to ensure that each preset chain left enough headroom in terms of volume (i.e., no clipping).
Finally, for each preset chain, no additional latency could be introduced on top of what was created by the instrument plugins being used. Because it’s possible to stack several effect plugins after the instrument plugins, if one was to use many heavy, resource-hungry plugins in their preset chain, it could make the preset’s playing response quite sluggish. To keep this at a minimum, Waves had me use only effect plugins that did not add extra latency time to the preset chains - which limited to a degree which effect plugins I could use in the creation of my preset chains.
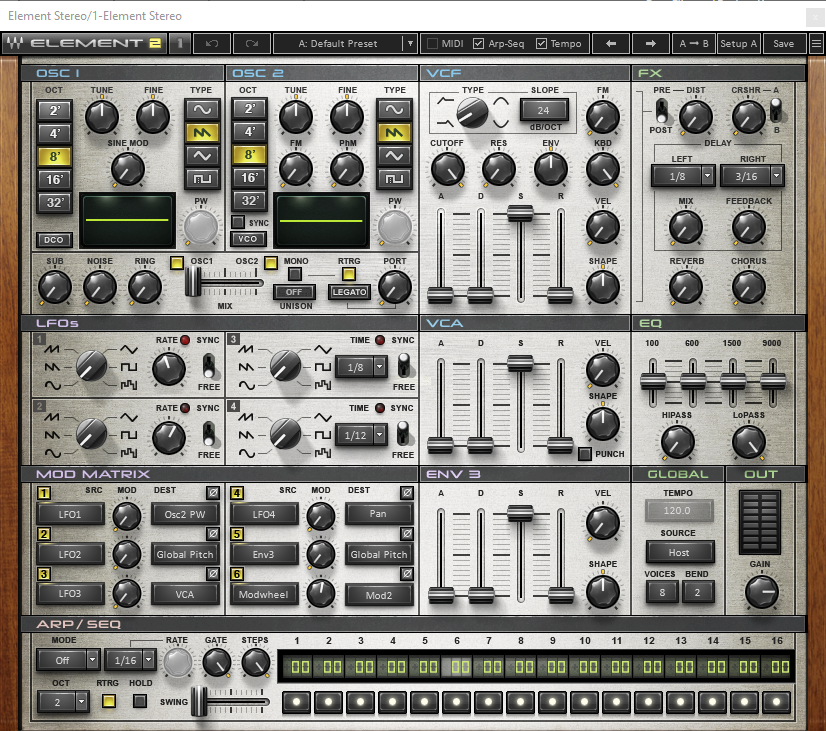
A screenshot of Element 2.0, Waves’ virtual analog synth plugin. This was typically my plugin of choice when creating synth leads, pads, keys, and basses.
Instruments and effects
Instruments
I was encouraged to focus on using three particular instrument plugins while creating these presets: Element 2.0, a virtual analog synth, Flow Motion, an FM synth, and CR8, a sampler plugin. While I occasionally ventured to some of Waves’ other virtual instrument offerings, these were the main ones that I used to create sounds for this project. I tried to play these instruments to their strengths in my process: for example, I often used Element to create lush pads and synth keys, thick leads and synth basses; I used Flow Motion to create plucks, bells, DX-style e.pianos, simulate electric tonewheel organs; and CR8 for drum and instrument loops, in particular.
But, I also tried to push the limits of these plugins in creative ways. Here are a few of my favourite examples:
-With a few presets using Element, I programmed OSC 1 to effectively behave like a LFO, while retaining such characteristics like its polyphony, and its frequency being determined (or at least influenced) by the values of the MIDI keyboard. I then explored different ways to use OSC 1 as a modulation source, such as frequency modulation, phase modulation and oscillator sync, all in relation to OSC 2, as well as general filter modulation. I mostly used this technique when programming a few pads and synth keys for interesting textures and rhythmic modulation ideas - the “Liquid Droplets Pad” and “Liquid Sludge Bass” preset chains in particular come to mind. (I was very much inspired by the PolyMod on my Prophet 10 for some of these ideas)
-I tried to find creative uses of the oscillators/operators in Flow Motion. One example was to use a noise oscillator to perform true frequency modulation on a saw wave for a fun, warbly texture (see preset “Textured Saw Wide Pad”). I also explored setting up the pitch of multiple oscillators as “notes” in a chord (to effectively play an entire chord by pressing one note), and to slightly detune/modulate the pitch of some of these oscillators for a lofi feel (see presets “7th Chord Sprinkler” and “Wonky Square Wave Chords”).
-With CR8, I “drew” in an LFO waveform to perform a quick and fun downward pitch sweep on the loop layers at every 4 measures or so, creating an effect similar to what we might get by slowing down a tape recording machine or a vinyl record (see preset “Dusty Minor Keys Loop”). In one preset, I also took advantage of the instrument’s nature as a sampler to create rhythmically interesting pads by layering different vocal samples of different lengths, quantizing them to a measure each, and having them play back simultaneously when the MIDI keyboard is played (examples include the presets “Pulsing Vocal Pad,” “Glitchy Minor Vocal Texture,” and “Choppy Vox Looper.”).

This is a screenshot of Flow Motion, Waves’ FM synth plugin. The settings in this particular screenshot are from my “Textured Saw Wide Pad” preset mentioned above.
In it, we can see that OSC 4 (bottom-left) is set to a noise waveform, and is performing true frequency modulation on OSC 1 (top-left). This created an interesting, warbly, and lo-fi texture.
Effects
With effect plugins, there were not any particular ones that I was encouraged to use, but as aforementioned, I needed to use lighter plugins that did not add any extra latency time to the chains. Unless the use of a certain plugin was essential to the chain, I generally tried to use complementary or standard effects that someone may want on certain sounds: for example, chorus and reverb on most synths, leads, pads, and keys; drive or distortion on basses, etc.
In some presets, however, I made the effect plugins a core part of the sounds. Examples include:
-“Reso Comb Synth Bass,” where I used an EQ plugin to create a (you guessed it!) comb filter effect that could be adjusted with Macros.
-”Wide Driven Chorus Synth,” where I took advantage of StudioVerse Instruments’ parallel split feature and used a delay plugin on one side to manually create a chorus effect. I added more character to this chorus by including a drive plugin on that same side of the parallel split as well.
-”Mega Flanger Squelcher Bass;” with the Kaleidoscope plugin providing the flanger effect, I selected the “input” option as the flanger’s modulator (this uses the audio input as the modulator), which allowed me to create a sort of “single flanger sweep” effect, rather than the typical continuous flanger effect produced from a modulator like a sine wave (I was effectively trying to mimic the idea of a filter sweep envelope that plays everytime a key is depressed on a synthesizer, but with a flanger).

The above screenshot demonstrates some of the innards of my “Wide Driven Chorus Synth” preset. To the right side of the screenshot, we see a parallel split device. I kept one side of the split dry, and used the H-Delay plugin to manually create a chorusing effect by using a very short delay time (30ms), and then engaging subtle delay time modulation.
My reasoning for manually creating a chorus effect like this, rather than simply using a normal chorus plugin, was to have the ability to further colour the wet side of the parallel split. In this case, I did so by following H-Delay with the Abbey Road REDD 17 plugin and turning up the drive and input gain to create a driven chorus effect. This is not usually possible with a standard chorus effect plugin.
Apart from the plugins, I also took advantage of the functionality of StudioVerse Instruments itself when appropriate in designing my preset chains. This includes examples like using the Instrument Layers to play several instrument plugins simultaneously for all-in-one presets, multi-band splits on bass patches to target my use of effects to higher frequencies only, or programming Macros to control different but complementary effects at different ranges of the knob to effectively “double-up” on the effects being engaged.

Editing Macros
This is a screenshot of the Macro Editing window in the StudioVerse Instruments plugin, and a good example of “doubling up” on effects with a single Macro.
I’d like to point out Macro 7 (M7: Dreamy), near the bottom, in particular. In this preset named “Dreamy Organ Arp,” I programmed Macro 7 to first turn up the dry/wet mix on CLA Epic, a reverb/delay plugin; this reaches its maximum once the knob is turned up to 50%. Past 50%, the macro then turns up the dry/wet mix on the next plugin in the signal chain, the CLA-76 compressor, to clamp down on and emphasize the spacey atmospherics from the previous reverb and delay plugin.
I like this example because it also demonstrates how Macros can be programmed to create pretty unique changes that we would not be able to get by operating a single parameter at a time. While this is just one example, I used this kind of technique on many preset chains to engage various complimentary effects using a single macro knob.
Demo
I thank you for reading this far, but can imagine you probably want to listen to some sounds, now! See this video below in which I play a selection of about 25% of the preset chains I created for StudioVerse Instruments. If you have StudioVerse instruments and would like to try playing my sounds for yourself, you can find them by simply typing my name (Gab Lavoie) in the plugin’s search bar, and then clicking on my name when it shows up to bring up only those presets that I created.
You can also read more about Waves StudioVerse Instruments here.